Pages

Sunday, October 21, 2018

Coding and Making with the BBC Micro:bit


Serendipity

At the 2017 ISTE conference in San Antonio, I had the serendipitous experience of wandering into a small conference room in search of a Minecraft Edu expert whom I hoped could help me with a Minecraft issue. He was busy being interviewed in the back of the room, so I sat down and waited near a group of people seated around a table of intriguing maker supplies. The people at the table were playing with BBC Micro:bits and assorted craft supplies. While waiting for the Minecraft expert, I joined the BBC Micro:bit session and was blown away by what I learned. I didn't solve the Minecraft issue, but I left the room with a head swirling with ideas for how I could incorporate the BBC Micro:bit device with students.


My first look at the BBC Micro:bit.
The Minecraft expert is in the back of the room -
I can't even remember what I had to ask him and if I had the chance or not!


What is a BBC Micro:bit?

I think of the Microbit as something in between a "Makey Makey" and an "Arduino" in terms of its use, complexity and accessibility. Like a "Makey Makey", this microcontroller can be alligator clipped to a playable banana keyboard, and like an arduino it and can be a controller for a car or robot. It has a low floor for entrance (so far I've used it with students as young as entering 3rd grade), and a high ceiling for growth.

Front and Back Features of the Mirco:bit

With interactive buttons and 25 individually programmed LEDs built in, the miro:bit can even be used to code and play simple computer games like pong. The LED grid on the micro:bit functions as a built-in primitive computer screen. The micro:bit also has built in sensors for light, sound and motion, and can communicate with other mirco:bits through Bluetooth connection. You can program your micro:bit to react to any of these sensors. This device was commissioned by the BBC to be used widespread throughout the UK, so it comes with an incredibly reasonable and affordable price tag of under $20. These devices can be purchased with additional materials from many sellers online. Most basic kits will include the necessary USB cable and external battery pack, which powers your micro:bit and its accessories (like a small servo motor) when it is not plugged into the computer. I ended up ordering the micro:bit basic kit for my students from Elextronix Express (one of the sellers linked from the microbit.org website) and didn't have any problems with the purchase.


Programming your Micro:bit
Find great projects with step by step instructions at Microsoft's https://makecode.microbit.org/

Being new the to the micro:bit myself, I found the Microsoft MakeCode website to be very accessible. This Javascript drag-and-drop block editor is easy to use for students with limited to no coding background. If you or your students are familiar with coding in Scratch or Blockly, you will find this code editor familiar to use. Additionally, it's free and students do not create profiles before coding. Since there is no logging on, all projects must be saved to your computer if you wish to go back to working on them. In order to download the project on your micro:bit, you must save the hex file to your computer, plug in the micro:bit through the USB, and drag the saved file on to the micro:bit folder. It's very simple to add the program to the microb:bit and the website will walk you through everything. The microbit can only hold one program at a time, so in order to change or revert the code, you will need to save the program again to your micro:bit to override the old code. I had one advanced student try the game tutorials on https://www.microbit.co.uk/games. It was not as simple and user friendly as the Microsoft tutorials, but it ended up working out great for that particular student. However, it appears that microbit.co.uk is no longer being updated, but new resources may be found at https://microbit.org/.


How I used Micro:bit with my 
Elementary Age Summer Camp Students


The grades 3-6 students at my continuing education coding and robotics camp were able to make some amazing projects by following & modifying the tutorials at Microsoft's MakeCode website. The "Projects" folder of this site has about 30 projects with step by step instructions for coding. The projects incorporate a range of the micro:bit sensors and some involve add-on materials from duct tape to servo motors. See below for just some of the projects my students tackled.

"Rock Paper Scissors" Project: 
This is a very simple intro project to the micro:bit. The micro:bit is programmed to randomly display an image of a rock, paper or scissors on the LED screen when the device is shaked. Students then use duct tape to make their own bracelet for the micro:bit. This game can be made more complex by incorporating the bluetooth capabilities of the micro:bit which enables them to communicate. We didn't tackle this, but we did use the built in bluetooth to enable the mirco:bits to send messages and emojis in the "mood radio" project.
Student downloading his code onto his micro:bit bracelet

Students testing out their Rock Papers Scissor Game

"Inchworm" Project:
This project gets more complex because of the all the "making" involved. It also requires an additional component - the servo motor. A small servo motor (SG90) is attached to the output pins on the micro:bit. Students then attach the servo motor to opposite sides of a bent cardboard piece with paper clips and duct tape. We never got the little robot to work perfectly, but it was a great project to learn how the miro:bit could be used to control robots. 
A student is downloading the code onto their Miro:bit inchworm robot

While we had the servo motor, duct tape and paper clips out, we also tried to make a micro:bit powered robotic cardboard hand that opens and closes. It sort of worked. 

"Hack you Headphones" & "Guitar" Projects:
This is another simple project and is great for introducing the outport rings on the micro:bit. Attach your headphones to the mirco:bit with alligator clips (as instructed in the tutorials) to listen to simple songs that you compose and program onto your device. The songs incorporate keyboard noises that are built in the code editor. The micro:bit does not have built in speakers, so you must use headphones. I loved how the code editor displays a small keyboard as you compose your tune - great connections to music class.

The cardboard micro:bit guitar reminded me of how similar this device can be to a "makey makey"

My Micro:bit Goals for the Future

The students that I teach in library (K-2) are younger than the students that I generally instruct at my summer camp. However, I was able to use the micro:bit with rising 3rd graders, so it may have a place yet in my library with the 2nd graders. It is more complicated with than the "Makey Makey", which some of my 2nd graders struggle with, so at this point I may introduce it first in after school robotics courses with my lower elementary age students. I would not rule out the mirco:bit for a K-2 school just yet, and I hope to make it a staple part of my grade 3-6 summer camp. Based on my experience, I find the micrb:bit to be an amazing and shockingly affordable addition to any upper elementary/middle school makerspace. Through this tiny device, students can gain great experience in coding and engineering.




Friday, August 18, 2017

Using Minecraft Modding to teach Java Programming


For the past three years I have run a week-long Minecraft summer camp, where students engage in collaborative creating & building in the Minecraft game and through hands-on STEAM related challenges. This year, I decided to take it a step further to use Minecraft modding to teach Java programming.

The only problem was, I knew nothing about Minecraft modding or Java!
But, fortunately, that doesn't need to stop you!

In my previous Minecraft camps, we often connected a challenge in the game to a hands-on build challenge.

Campers design structures to withstand a Mentos & Diet Coke volcano

For example, students may build a tower together in the game, and be challenged in groups to complete the marshmallow tower challenge. They may have to build a bridge to carry sheep across a river or lava field, and also create a bridge out of tooth picks and gum drops. One of my favorites was when they crafted defenses around a village in the game to protect from a volcano, and then built their own real world structures out of Magic Nuddles to withstand a Mentos & Diet Coke volcano. Through these experiences we focused on the engineering design model and on creativity & collaboration. I used the educational version of the game, Minecraftedu, which allowed me to host my own server and provided me with additional teacher controls.

Campers making perler bead Minecraft art
Campers collaborating on a newspaper fort

This year I decided to take it a step further, and offer an additional camp that would use Minecraft to teach coding. Each year my summer campers asked if we could play Minecraft as a group with "mods." Mods, short for modifications, are changes to the original gameplay. Mods are created by "modders", who code their alterations to the game in Java (the program Minecraft is written in). MinecraftEdu is in itself a modified version of the game, which gives the teacher controls like the ability to freeze or teleport students. While we didn't run different mods at the students' requests, it gave me the idea of running a separate Minecraft modding camp which would teach students how to code their own mods in Java.

 I set off to make a Minecraft modding camp a reality. The only problem being that:
1. I didn't know anything about modding
2. I haven't progressed in coding much beyond drag-and-drop programming

After searching online for solutions to these two problems, I stumbled across Code Kingdoms. What I found seemed too good to be true. They basically offered a service for the exact camp I was hoping to run. Their platform teaches students to code their own Minecraft mods in Java using a drag-and-drop format. Teachers do not need to be experts, and can act more as facilitators, as they offer extensive video tutorials for tiered modding challenges. Inviting your friends to try out your mod in your own server is also made super easy.

The Code Kingdoms Homepage (8/2017)

I sent them an inquiry email, and heard back shortly after. Soon I was video conferencing with representatives, learning about their service and how I could make this Minecraft modding summer camp a reality. Although it is a paid service, I was set up with a free account to explore the courses offered and learn more about the product. It didn't take long to settle on Code Kingdoms for my camp. The per-camper account fees were also reasonable. I ended up settling on a plan for one week-long credit per student. (As of last week, this plan is no longer offered but the new packages also seem reasonable.) Over the next few months before my 2017 summer "Minecraft Modding with Java" camp would begin, I explored the course offerings from Code Kingdoms to familiarize myself with modding in Java.


Courses are tiered by age level

The modding courses were a little intimidating at first, as most take 2-4 hours to complete. However, the steps are broken down into entertaining 15 minute videos, and the code editor provides instant feedback on whether you are coding it correctly. You can also try out your mod in progress before completing it, so you do not need to wait 4 hours to play your mod in Minecraft. Even though it is drag-and-drop coding, the code editor does allow you to see what your code would look like if you wrote it out entirely yourself. This helped me understand what programming in Java actually looks like.

A screen shot of the "Hungry Games" mod being written with drag-and-drop blocks

The same code as above, viewed in Java without the graphical drag-and-drop blocks


Many of the courses teach students how to create popular mods that are already out there, such as "Hungry Games", a player vs player mod based on the battle arena in the Hunger Games book. On a few occasions, I messed up on my code and became quite frustrated. The code editor alerts you to the location of the bad code and tells you what is wrong, but it doesn't exactly provide enough information to guarantee a novice can fix it. However, going back and watching the video tutorials more carefully and viewing provided hints always helped me solve the problem. That and taking a few minutes away from the computer to regain my thoughts!

I was a little worried that my campers would also become frustrated by how long the mods took to program, but I was relieved to discover the "Course Extensions" page. This section provided quick little mods that typically take 5 minutes to code.  Here, students would be able to test out and play their mod with friends after minutes instead of after hours of coding. Some course extension mods included alterations to the game like enabling a character to teleport, cast lightning, or assign player specific mods. My campers range from grades 3-6, so the organization of courses by age level was also helpful.

Campers are watching a modding tutorial and discussing it as a class before attempting on their own
During our 5 day Minecraft Modding camp, I would begin our lesson with whole-group modding challenges. We watched a quick course extension mod video as a class, and discussed the coding principals involved. Concepts introduced and reviewed included those such as booleans, methods, strings, and conditionals. Having taught Scratch coding to students and campers before, this felt very familiar. Campers then tried the quick mod on their own, and were encouraged to add their own changes. When complete, they invited friends to play out their mods in their server. After these introductions, some students went on to tackle the 2-4 hour long modding courses, while others stuck mainly to coding the quick course extension mods. Some campers spent more time playing out their mods in the game, others spent more time coding. My co-instructor and I walked around and assisted and encouraged students as needed. By the end of the 5 days, I was thrilled to see how much the students had learned about coding their own mods in Java. Some campers even continued modding when they went home each day.

Campers are busy modding away!

After seeing how smoothly everything ran, and how much the campers loved learning Java to mod minecraft, I know I will continue to run this Minecraft Modding camp again in the future. After seeing how sad they were that the camp was over, I imagine I'll see many of the same campers again next year!


Notes about Set-Up
In the weeks leading up to the camp, I downloaded Minecraft on all of the computers in the lab, and quickly learned that the firewall needed to be adjusted. Since the Code Kingdoms mods only run on regular (or Vanilla) Minecraft and not MinecraftEdu, our firewall was blocking the game from opening. For those of you with the same problem, the solution was to have your district admin open outbound access to TCP port 25565. Since I could not use MinecraftEdu, I also had to make sure that my campers came with already having access to the  PC version of the game. This meant that their parents had to purchase a Mojang account for them online prior to the camp beginning ($26.95). If the campers did not have their own Mojang account, they would not be able to test out and play the mod they wrote on the Code Kingdoms website. You can download the game on the computers without buying it, but into order to actually open the file and play the game, you need to sign in with your Mojang account. Lastly, I realized that with all of the video tutorials running simultaneously in the computer lab, it would be best to encourage all students to bring their own headphones.

While I continue to run my traditional Minecraft camp as in the past, I have not yet navigated to the updated MinecraftEdu (after its purchase by Microsoft). This is because my students do not have the necessary Office Student accounts (we are a Google Apps for Edu school). Eventually I may need to find a way to do this as the pre-Microsoft MinecratEdu version becomes obsolete.


If you have any questions about my experience, please comment below!


Monday, June 26, 2017

ISTE Presentation: 
From Library to Learning Commons


Click the Image to View Our 2017 Presentation:
 Link to Our ISTE Presentation
Link to our ISTE Presentation 


Monday, May 29, 2017

Portable Green Screens in the Library

Don't throw that Pizza Box Away! - Portable Green Screens in our K-2 Library -


Three kindergarten boys working on their movie


How and why you should turn all those pizza boxes into portable television studios for your students. 


Whole class filming is a wonderful experience,
but how can we increase student ownership?

Earlier in the school year my students created whole-class videos using our large green screen studio. While I assigned students a variety of tasks (director, camera operator, acting coach), my students spent the majority of their time on the carpet as an audience member. At the end of these units I wondered how we could increase student ownership of the production. Could I have my students create a green screen movie without having to play the audience member for large portions of the time? Could they be empowered to create a movie independently of the teacher? Could this be done by kindergartners and first graders?


For most of the school year I struggled with these questions. That was until I met Brenda Windsor and Mary O'Neil of Trumbull, CT at the Fairfield University "Education Technology Collaboration Day" in March.  Brenda and Mary presented on how they have incorporated green screens in the classroom, and shared the idea of using a pizza box to make a miniature portable studio. Here is a link to the video they created.  From that moment, I was on a mission to have my K-2 students write, direct, film & star in their own collaborative group mini green screen movies.

How I imagine my kindergartners, except without the beard. 


Kindergartner researching &
taking notes on PebbleGo
I eventually decided to offer the pizza box green screen activity as a choice for students to demonstrate their learning about animals they researched in the library.  All of my kindergartners and first graders researched and took notes on animals using PebbleGo. Following their research, I gave them three options to demonstrate their learning to the class. The options included a Scratchjr coded video, ChatterPix student narration, or the green screen project. The majority of my students jumped on the opportunity to try out the pizza box green screen. Here's how I got them started:


A 1st grade students selecting Green Screen
as an option and beginning to plan their story.

Step 1: Eat 8 large pizzas and bring the empty boxes to school. This is the most fun of all the steps. 
Fortunately my friends helped me on this front. That and kind
pizza shop owners donating empty boxes to a pleading teacher!


Seven separate stations are set up so multiple groups
could record at once.
.
Step 2: Prepare the green screen stations. To make the boxes green, we pasted green construction paper to the inside. Green paint would also have worked out fine. We also wrapped rulers in green paper, so that the students could paste their characters on them. I also made sure that DoInk, the green screen app we would use, was loaded on all the iPads. Additionally, I loaded a dozen animal habitat background images to the camera roll on the iPads. This way, my K-2 students would be able to choose their background without having to search online. Before sending my students off, we reviewed how to use DoInk as a class on the SmartBoard.


1st graders drawing and cutting out their animals

Step 3: After my students researched, their next step was to draw and cut out the animals they studied. I loved how a technology project involved the students coloring with crayons and making delicate cut outs with their scissors! It was fun hearing the students remind each other not to draw green animals. At this point, I let students work together or individually. I gave them time to write scripts, but many students simply used their notes and improvised. 


Step 4: Unleash the chaos. As students were ready, they taped their animals to the green sticks and went off to record. Some worked alone, others combined their animals into a single story. Their movies could be fictional, as long as they shared the facts they learned about their animals. The library was alive and buzzing with students working. As students finished their projects, they saved their videos to the camera roll on the iPads. I relied heavily on "ask 3 before me", my parent volunteers, and knowledgeable students to help those in need during the simultaneous recording. I loved the level of collaboration I saw, as students worked together, trouble shooting problems during their filming.


These 1st graders are figuring out how to
 position their characters on the screen.


This first grader is working alone on her
movie about Arabian Horses. 
Step 5: Upload the student work to Google Drive. After the students finished their recordings (some students needed a few extra days to complete their work during flexible book checkout time), I went to each iPad and uploaded the student projects from the camera roll to a Google Drive folder. Not all of the projects were student viewing-ready, but I was impressed by the high percentage that were done really well. 


Step 6: Viewing Day. After uploading over 60 student videos to a Google Drive folder, my next goal was to share these videos with the K-1 students for viewing. The videos included the pizza box green screen projects as well as the Scratchjr and Chatterpix options that some students selected. To share out the Google Drive folder, I had the students log onto a Nearpod presentation. I embedded a view only link to the folder in the Nearpod presentation. Students were given 10 minutes to view as many of the projects as they could. Following the viewing, they wrote and submitted compliments through the Nearpod app.


Kindergarten students viewing each other's projects
as we celebrate our work


The students had such a great time at the pizza box green screen that we will be using them again shortly in the future. Next time, they will be retelling folktales that we read in the library. Not all of my students were able to finish their green screen projects in advance of the viewing day, but they chose to keep on working on their films regardless because of how much fun it was. Here's some examples of their projects below:


A Kindergartner's individual movie about barracudas


Two students work together on an arctic fox video


Three 1st graders teaming up with different animals and having fun


Monday, January 2, 2017

Stations Provide Choice and Exploration During Book Checkout


How Stations Can Provide Choice & Exploration During Book Checkout, While Reinforcing Curriculum Goals. 


Osmo Tangram Station
On a typical day in the library, our K-2 students spend the last 10-15 minutes of their 30-minute library class freely checking out books. Since transitioning from a classroom middle school teacher to elementary library media specialist last year, I often struggled with how to engage some reluctant students during this flexible time. While most students used this time to locate and read books, inevitably a handful of students in each class would forget to return a book (which prevents them from checking out a new one). Others sought to play hide and seek in the stacks, or watched the clock until this time ended. My classes share the space with a second media specialist's class, resulting in upwards of 45 students using the space at a time for checkout. This can pose some real management problems if the students are not engaged. Given our situation, the other media specialist, Erica, and I began to explore how we could incorporate open choice stations during book checkout time. These stations, which would be aligned with our learning commons curriculum goals, would engage students through free choice and exploration.

We rolled out stations with little to announcement or instruction:
An hour of code computer station ( 6 computers)
We decided to roll out the stations over the period of a couple months, with little to no announcements or fanfare each time a new one was introduced. By taking our time with introducing the stations, we were able to see how the students engaged with them, allowing us to plan considerations for future stations. By providing little to no introductions, we attempted to prevent large groups of students from simultaneously flocking to a new station during book checkout.  We also wanted students to take ownership of how they engaged with the stations, and to learn independently through exploration. My inspiration for this approach was the "hole in the wall" in New Dehli, where Sugata Mitra learned that children working in groups could teach themselves to use a computer without any formal instruction.


Listening Station (1 of 3)
Our first stations were simple and aligned with literature appreciation:
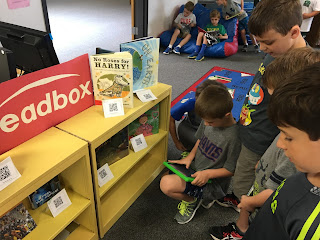
Our first stations to be introduced were the "Readbox" and listening stations. The Readbox had been introduced last year as the only station during book checkout (link to blog post). At this station, students can scan a QR code next to a book to view a 30 second ChatterPix review of it created by a peer. At our listening stations, students in groups could read along with a book on a tape. Along with providing comfortable bean bag chairs for quiet reading, we saw an immediate transformation in how students engaged during book checkout time. The need to manage student behavior during this free time dropped significantly. Students who forgot to return a book could immediately join a listening station or explore the Readbox. Other students who quickly found a book had choices to engage in if they wished to read it at a later time. 


Our Readbox of student created book reviews

1 of  3 quiet reading spaces

Students watching/reading along with Bookflix videos

After finding the students engaging well in the initial stations, we next introduced our final literature appreciation station - the Bookflix Station.  We logged a row of 6 computers on to the Scholastic Bookflix database. Initially we chose a specific Weston Woods video ahead of time for the students to watch, but quickly found that students learned from each other how to navigate the site and find the stories that interested them. After seeing our own "hole in the wall" experiment work we no longer selected the videos for students and allowed free choice.
Bookflix home page


After building a culture of engaging in free choice stations, our next ones involved greater use of technology and focused on collaboration, tech skills, and problem solving:

After a month of rolling out our various literature appreciation stations, we placed two Osmo Tangram stations in the library without any explanation. When groups of students inevitably found and flocked to these stations, we discussed common sense rules for taking turns, sharing, and collaborating.  These two Osmo stations became so popular, that we had to introduce a new rule to our stations - you must check out your book before engaging in a station. This rule helped prevent students from waiting until the last minute of library to check out their book (an unintended consequence of our stations that we hoped to avoid.) Given the success of the Osmo Tangram station, we added three new Osmo stations. This included one "Newton" station, and two Coding stations. While occasionally we will need to intervene in groups that struggle to take turns, I have been  incredibly impressed and thrilled by the level of collaboration and teamwork seen at these stations. Our final station to be introduced was during the Hour of Code week, when we logged another row of 6 computers on to Kodable. Again, we provided no instructions and allowed the students to explore and learn together. 


Osmo "Newton" Station

Our Takeaways:

It has been a wonderful experience watching the "hole in the wall" experiment succeed in our library learning commons.  By providing these free choices during book checkout, we have tapped into a significant amount of time each class to provide learning opportunities aligned with our program goals (literature appreciation, technology skills, digital citizenship, communication collaboration and innovation, and inquiry).  Students are excited to use the space and explore together, and while some students still choose to engage in off task behavior from time to time, these occurrences are significantly reduced. The balancing act at this point is to not detract from the experience of checking out books during this time. For the most part, we find that some students need simple reminders to find their book before engaging in a station. Whether it's avoiding large groups or having a diversity of interests, we also find that for the most part students tend to spread themselves well across the library without being assigned a specific station. Some students still decide to read quietly or together with friends on the bean bad chairs and not engage in any station.

In the week leading to our holiday break, a 1st grade student asked me if she had library class on December 23rd. When I asked why, she told me with a somber expression that her family was leaving for Disney World on the 23rd, and she didn't want to miss library. If for that student, her elementary school library can compete with Disney World for her interest, then I like where we are heading.

Tuesday, June 21, 2016

ISTE Presentation - Transform Your Library into a Learning Commons


I'm excited to present my poster next week at ISTE 2016! Click on the image below to view my Google Slides presentation on our transformation to a library learning commons.

If you are attending, stop by at:

Monday, June 27, 8:00–10:00 am MDT

Building/Room: CCC Lobby D, Table 32


Monday, June 20, 2016

How to Have Successful Learning and Making Stations with a Fixed Schedule

How do you build enriching maker and learning spaces within the confines of a jam-packed fixed schedule? 


If you are new to the idea of making in the library, there are great blogs dedicated to this movement. I recommend checking out Laura Fleming's Worlds or Learning, and Diana Redina's Renovated Learning. Diana Redina defines a maker space as "a place where students can gather to create, invent, tinker, explore and discover using a variety of tools and materials." Laura Fleming provides some best practices for successful maker spaces, which includes focusing on themes  and curriculum connections. Maker spaces provide great opportunities to foster creativity, collaboration, and innovation, but...what if you don't have a dedicated maker space, what if you don't have a flexible schedule, what if, like me, you teach eight 30-minute classes a day with no transition time? What if like me you share your library with a second media specialist, who teaches a class (sometimes a different grade) at the same time? What if like me, you have 1,000 students, coming to the library twice a week? How do you begin to make this work? This article shows our journey to initiate stations within our fixed library schedule. Some of these stations could be considered maker stations, others we call our learning stations.


A full tour of our library learning and making stations


Step 1: Consider your Curriculum Connections.
The first step, as with any unit planning should be to begin at the end. Reflect on why you wish to adopt learning and making stations in your library. What are the student learning outcomes and standards you wish to address. These are critical questions to consider, as you must be prepared to answer them when asked by classroom teachers, parents, and administrators. 

My colleague, Linda, and I began by looking at the K-12 mission statement and program goals for our district library learning commons:

Our K-12 Vision Statement:


The Learning Commons of Wilton Public Schools will be the physical and virtual core of our inquiry-based learning community. By fostering the development of socially responsible, empathetic and compassionate citizens, members will become creative and critical thinkers who effectively innovate and collaborate in a globally interconnected society.


Our K-12 Program Goals:

1. Inquiry and Information Fluency
2. Literature Appreciation
3. Technology Skills and Concepts
4. Digital Citizenship
5. Collaboration Innovation and Communication

Learning and making stations fit well with our district library learning commons vision. They also provided opportunities for more authentic, meaningful, and student-centered learning experiences. The planning behind each learning and making station began with the question, "which of our program goals is this station addressing?" We also wrote down Common Core State Standards, AASL,and ISTE NETS that applied.


Step 2: Create Some Initial Learning/Making Station Themes with "I can Statements"
With a fixed schedule and combined classes totaling 45 students meeting at the same time, we decided to create 8 separate learning and making stations in the library. Students come to library twice a week, so we decided to make their second library visit of the week a stations day. We used the entire library space to spread out these stations. All of our K-2 students would be engaged in the same stations, with minor modifications. Students would rotate through these 8 stations, trying a new station each week over a 2-month period.  Each station would address one of our K-12 program goals (communication, collaboration and innovation became a central theme). We placed a sign at each station, with an "I can" statement to provide direction for the students as to their learning objective. Our signs were inspired by Heidi Neltner's blog post on Maker Centers. We also placed tech instruction signs for our parent volunteers to assist students. 

This news letter to the parents reveals our initial 8 stations and "I can" statements

These station signs show some additional centers during a later unit, which included a book recording station, technology timeline museum, and presentation station. Here's a Vine video of those new stations.


Table sign for our "Presentation Station"


Step 3: Begin to Build a Culture of Innovation  
Before we rolled out the stations, we worked to prepare our students and parent volunteers for this significant shift in the library experience. This was my first year as a media specialist in our school, and up until this year, the library still followed a very traditional model. In order to make this work, we needed to prepare students with our expectations. Additionally, we needed to build support among the parent volunteers, so that they could assist students at the stations, and see the value in these changes.

To build a culture of innovation with the students, I followed the advice I learned from Maureen Schlosser's (@MaureenSchlosse) presentation on STEAM activities in the library at CECA/CASL 2015. Maureen's Knowledge Quest article, 5 Books to Introduce STEAM, provided some great ideas for books to build this culture. Using this article as a resource, I began pre-teaching with the following lessons:

Day 1. We Read and discussed the picture book "What Do You Do With An Idea?" written by Kobi Yamada and illustrated by Mae Besom. As a class, we discussed how we can make ideas grow, not be embarrassed by our ideas, and support each other. Kindergartners and first graders drew pictures of exciting ideas they wanted to grow. Second graders wrote about their ideas and posted online to a Padlet wall. We then introduced the idea of learning and making stations, and let the students know we would soon have a place to build our ideas.


Our 2nd grade students' Padlet of Ideas


Day 2. We read and discussed "Too Much Noise in the Library" written by Susan Margaret Chapman and illustrated by Abby Carter. As a class we discussed how libraries can be lively and loud, but differentiated between good noise and bad noise. As a class we discussed expectations for the upcoming stations.

We reviewed these expectations at the start of every stations day

Day 3: We read and discussed "The Most Magnificent Thing" by Ashley Spires. This was a great text
to discuss perseverance, and how we keep from quitting when it gets tough.


Day 4: We began our stations. I called on students one at a time to sign up for a station. We limited the number of students at each station, and used the Smart Board to track totals. 

A Smart Board file used to track totals each class


Step 4: Plan for Space & Technology Needs

Without a dedicated maker space, we decided to roll out the stations throughout the entire library. This spread-out spacing provided some sound barriers between groups that were collaborating, and other students who were working independently or recording their voices on iPad presentation apps. Our stations involved some robotics purchases, but these are not necessary to getting started. There are wonderful ideas out there, including the linked sites in this posting, for affordable and low tech maker stations. You'll need to consider your students, space, finances, and even scheduling. With our fixed schedule of 8 library sessions a day, with 2 classes meeting at the same time (over 350 students each day, about 1,000 students coming twice each week), we stayed away from maker stations that required a lot of perishable supplies and clean-up. If you are interested in involving coding/robotics in your stations, here's what we have tried and found successful:

1. Scratchjr App - This is a free app, but since it is not web-based, it requires a tablet (iPad or Android) to run. Check out my previous blog post about how Scratchjr can be used as a multi-media presentation tool for students to share out stories or their learning.

2. Dash & Dot - Created by the Wonder Workshop, these robots provide great opportunities to teach the fundamentals of coding and robotics. They come with a collection of free apps, which includes the Path App (for all ages including pre-readers) and Blockly (for students 8+). Dash retails for $149.99, and Dot for $49.99. Additional accessories can be purchased including a ping pong ball launcher for Dash. The Wonder Workshop also provides great resources and lesson ideas for teachers. 

3. Cubelets - Created by Modular Robotics, these robot building blocks enable students to construct interactive robots by simply snapping the various cubes together in purposeful arrangements. No coding or wiring required. The Cubelets station is incredibly popular, and provides great opportunities for critical thinking and collaboration. Like Dash & Dot, they come with adapters so that you can build on them with Legos. One downside of Cubelets is that they are pricey. If you have a group of students working together, you will want at least 3 batteries, and some larger kits. Be prepared to spend over $500. Over the year, I did experience some problems with defective cubes, but costumer service was excellent and supportive, so I kept coming back for more Cubelets.


4. Makey Makey - This easy to use invention kit lets you substitute everyday conductive objects for your keyboard by alligator clipping the object to the Makey Makey (a credit card sized device similar to an Arduino Board). This enables the user to turn objects like bananas, play dough, metal, water, or people into game controllers, musical instruments, camera clicks, or whatever you dream up. The Makey Makey plugs into a computer through the USB, no downloads required. This worked great for 2nd graders, but could be conceptually challenging for K-1. I'm looking forward to adopting a simpler version, the Makey Makey Go, with K-1 next year. At our stations this year, we brought up a code for a piano (through Scratch) and had students build a piano out of some provided objects. We also challenged students to make game controllers for pong and pacman. This also provides an opportunity to teach computer coding. The Makey Makey Classic runs for $49.95, and the simpler "Go" version for $24.95. Side note: because of wheat allergies, we used Crayola Magic Clay instead of Play Dough at our station. 

Again, these purchases are not required to begin learning and making stations, and there are other robotics and coding products out there. But we were pleased with these devices and are happy to share our use of them. We were fortunate enough to have the support of our PTA and Wilton Education Foundation in making these purchases possible. If that is not possible for your library, you may want to check out options like Donors Choose to crowd-source funding. If you're looking for other great early elementary school ideas, check out Nan Stifel's Blog and follow her on Twitter (@nstifel). Her ISTE 2015 poster presentation on pairing books with maker activities introduced me to Cubelets. 

Step 5: Just Go For It!

After all of our planning, we still didn't feel ready and had no idea if this was even going to work. Would students be engaged? Could they handle the independent work? Could two library media specialists coordinate a combined class of 45 students working in 8 separate groups? Throughout the 8 week unit, we made minor adjustments in the layout of stations, modifying expectations for grade levels, and eliminating an origami station that required too much teacher support. In the end, we were amazed by the high levels of student engagement and collaboration. To quote a colleague, who it turns out was quoting Victor Kiam, "even if you fall on your face, you're still moving forward"


Some Student Data:
At the end of our first 8-week session, we used Nearpod to poll the 2nd graders about their experience. Here are some findings:


If you read through this entire blog post, I'm very impressed! Please leave a comment or questions below! If you are attending ISTE 2016, come visit me at my poster presentation!